Changes in rankings of smartphone search results

Webmaster level: Intermediate

Smartphone users are a significant and fast growing segment of Internet users, and at Google we want them to experience the full richness of the web. As part of our efforts to improve the mobile web, we published our recommendations and the most common configuration mistakes.

Avoiding these mistakes helps your smartphone users engage with your site fully and helps searchers find what they're looking for faster. To improve the search experience for smartphone users and address their pain points, we plan to roll out several ranking changes in the near future that address sites that are misconfigured for smartphone users.

Let's now look at two of the most common mistakes and how to fix them.

Faulty redirects

Some websites use separate URLs to serve desktop and smartphone users. A faulty redirect is when a desktop page redirects smartphone users to an irrelevant page on the smartphone-optimized website. A typical example is when all pages on the desktop site redirect smartphone users to the homepage of the smartphone-optimized site. For example, in the figure below, the redirects shown as red arrows are considered faulty:

This kind of redirect disrupts a user's workflow and may lead them to stop using the site and go elsewhere. Even if the user doesn't abandon the site, irrelevant redirects add more work for them to handle, which is particularly troublesome when they're on slow mobile networks. These faulty redirects frustrate users whether they're looking for a webpage, video, or something else, and our ranking changes will affect many types of searches.

Avoiding irrelevant redirects is very easy: Simply redirect smartphone users from a desktop page to its equivalent smartphone-optimized page. If the content doesn't exist in a smartphone-friendly format, showing the desktop content is better than redirecting to an irrelevant page.

We have more tips about redirects, and be sure to read our recommendations for having separate URLs for desktop and smartphone users.

Smartphone-only errors

Some sites serve content to desktop users accessing a URL but show an error page to smartphone users. There are many scenarios where smartphone-only errors are seen. Some common ones are:

  • If you recognize a user is visiting a desktop page from a mobile device and you have an equivalent smartphone-friendly page at a different URL, redirect them to that URL instead of serving a 404 or a soft 404 page.

  • Make sure that the smartphone-friendly page itself is not an error page. If your content is not available in a smartphone-friendly format, serve the desktop page instead. Showing the content the user was looking for is a much better experience than showing an error page.

  • Incorrectly handling Googlebot-Mobile. A typical mistake is when Googlebot-Mobile for smartphones is incorrectly redirected to the website optimized for feature phones which, in turn, redirects Googlebot-Mobile for smartphones back to desktop site. This results in infinite redirect loop, which we recognize as error.

    Avoiding this mistake is easy: All Googlebot-Mobile user-agents identify themselves as specific mobile devices, and you should treat these Googlebot user-agents exactly like you would treat these devices. For example, Googlebot-Mobile for smartphones currently identifies itself as an iPhone and you should serve it the same response an iPhone user would get.

  • Unplayable videos on smartphone devices. Many websites embed videos in a way that works well on desktops but is unplayable on smartphone devices. For example, if content requires Adobe Flash, it won't be playable on an iPhone or on Android versions 4.1 and higher.

Although we covered only two types of mistakes here, it's important for webmasters to focus on avoiding all of the common smartphone website misconfigurations. Try to test your site on as many different mobile devices and operating systems, or their emulators, as possible, including testing the videos included on your site. Doing so will improve the mobile web, make your users happy, and allow searchers to experience your content fully.

As always, please ask in our forums if you have any questions.

6 Quick Tips for International Websites

Note from the editors: After previously looking into various ways to handle internationalization for Google’s web-search, here’s a post from Google Web Studio team members with tips for web developers.

Many websites exist in more than one language, and more and more websites are made available for more than one language. Yet, building a website for more than one language doesn’t simply mean translation, or localization (L10N), and that’s it. It requires a few more things, all of which are related to internationalization (I18N). In this post we share a few tips for international websites.

1. Make pages I18N-ready in the markup, not the style sheets

Language and directionality are inherent to the contents of the document. If possible you should hence always use markup, not style sheets, for internationalization purposes. Use @lang and @dir, at least on the html element:

<html lang="ar" dir="rtl">

Avoid coming up with your own solutions like special classes or IDs.

As for I18N in style sheets, you can’t always rely on CSS: The CSS spec defines that conforming user agents may ignore properties like direction or unicode-bidi. (For XML, the situation changes again. XML doesn’t offer special internationalization markup, so here it’s advisable to use CSS.)

2. Use one style sheet for all locales

Instead of creating separate style sheets for LTR and RTL directionality, or even each language, bundle everything in one style sheet. That makes your internationalization rules much easier to understand and maintain.

So instead of embedding an alternative style sheet like

<link href="default.rtl.css" rel="stylesheet">

just use your existing

<link href="default.css" rel="stylesheet">

When taking this approach you’ll need to complement existing CSS rules by their international counterparts:

3. Use the [dir='rtl'] attribute selector

Since we recommend to stick with the style sheet you have (tip #2), you need a different way of selecting elements you need to style differently for the other directionality. As RTL contents require specific markup (tip #1), this should be easy: For most modern browsers, we can simply use [dir='rtl'].

Here’s an example:

aside {
 float: right;
 margin: 0 0 1em 1em;
}

[dir='rtl'] aside {
 float: left;
 margin: 0 1em 1em 0;
}

4. Use the :lang() pseudo class

To target documents of a particular language, use the :lang() pseudo class. (Note that we’re talking documents here, not text snippets, as targeting snippets of a particular language makes things a little more complex.)

For example, if you discover that bold formatting doesn’t work very well for Chinese documents (which indeed it does not), use the following:

:lang(zh) strong,
:lang(zh) b {
 font-weight: normal;
 color: #900;
}

5. Mirror left- and right-related values

When working with both LTR and RTL contents it’s important to mirror all the values that change directionality. Among the properties to watch out for is everything related to borders, margins, and paddings, but also position-related properties, float, or text-align.

For example, what’s text-align: left in LTR needs to be text-align: right in RTL.

There are tools to make it easy to “flip” directionality. One of them is CSSJanus, though it has been written for the “separate style sheet” realm, not the “same style sheet” one.

6. Keep an eye on the details

Watch out for the following items:
  • Images designed for left or right, like arrows or backgrounds, light sources in box-shadow and text-shadow values, and JavaScript positioning and animations: These may require being swapped and accommodated for in the opposite directionality.
  • Font sizes and fonts, especially for non-Latin alphabets: Depending on the script and font, the default font size may be too small. Consider tweaking the size and, if necessary, the font.
  • CSS specificity: When using the [dir='rtl'] (or [dir='ltr']) hook (tip #2), you’re using a selector of higher specificity. This can lead to issues. Just have an eye out, and adjust accordingly.

If you have any questions or feedback, check the Internationalization Webmaster Help Forum, or leave your comments here.

Getting started with structured data

Webmaster level: All

If Google understands your website’s content in a structured way, we can present that content more accurately and more attractively to Google users. For example, our algorithms can enhance your search results with “rich snippets” when we understand that your page is a structured product listing, event, recipe, review, or similar. We can also feature your data in Knowledge Graph panels or in Google Now cards, helping to spread the word about your content.

Today we’re excited to announce two features that make it simpler than ever before to participate in structured data features. The first is an expansion of Data Highlighter to seven new types of structured data. The second is a brand new tool, the Structured Data Markup Helper.

Support for Products, Businesses, Reviews and more in Data Highlighter

Data Highlighter launched in December 2012 as a point-and-click tool for teaching Google the pattern of structured data about events on your website — without even having to edit your site’s HTML. Now, you can also use Data Highlighter to teach us about many other kinds of structured data on your site: products, local businesses, articles, software applications, movies, restaurants, and TV episodes. Update: You can see the full list of schemas supported in Data Highlighter here.

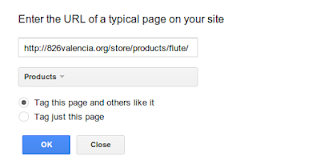
To get started, visit Webmaster Tools, select your site, click the "Optimization" link in the left sidebar, and click "Data Highlighter". You’ll be prompted to enter the URL of a typically structured page on your site (for example, a product or event’s detail page) and “tag” its key fields with your mouse.

Google Structured Data Highlighter

The tagging process takes about 5 minutes for a single page, or about 15 minutes for a pattern of consistently formatted pages. At the end of the process, you’ll have the chance to verify Google’s understanding of your structured data and, if it’s correct, “publish” it to Google. Then, as your site is recrawled over time, your site will become eligible for enhanced displays of information like prices, reviews, and ratings right in the Google search results.

New Structured Data Markup Helper tool

While Data Highlighter is a great way to quickly teach Google about your site’s structured data without having to edit your HTML, it’s ultimately preferable to embed structured data markup directly into your web pages, so your structured content is available to everyone. To assist web authors with that task, we’re happy to announce a new tool: the Structured Data Markup Helper.

Like in Data Highlighter, you start by submitting a web page (URL or HTML source) and using your mouse to “tag” the key properties of the relevant data type. When you’re done, the Structured Data Markup Helper generates sample HTML code with microdata markup included. This code can be downloaded and used as a guide as you implement structured data on your website.

Structured Data Markup Helper

The Structured Data Markup Helper supports a subset of data types, including all the types supported by Data Highlighter as well as several types used for embedding structured data in Gmail. Consult schema.org for complete schema documentation.

We hope these two tools make it easier for all websites to participate in Google’s growing suite of structured data features! As always, please post in our forums if you have any questions or feedback.

Using schema.org markup for organization logos

Webmaster level: all

Today, we’re launching support for the schema.org markup for organization logos, a way to connect your site with an iconic image. We want you to be able to specify which image we use as your logo in Google search results.

Using schema.org Organization markup, you can indicate to our algorithms the location of your preferred logo. For example, a business whose homepage is www.example.com can add the following markup using visible on-page elements on their homepage:

<div itemscope itemtype="http://schema.org/Organization">
<a itemprop="url" href="http://www.example.com/">Home</a>
<img itemprop="logo" src="http://www.example.com/logo.png" />
</div>

This example indicates to Google that this image is designated as the organization’s logo image for the homepage also included in the markup, and, where possible, may be used in Google search results. Markup like this is a strong signal to our algorithms to show this image in preference over others, for example when we show Knowledge Graph on the right hand side based on users’ queries.

As always, please ask us in the Webmaster Help Forum if you have any questions.

5 common mistakes with rel=canonical

Webmaster Level: Intermediate to Advanced

Including a rel=canonical link in your webpage is a strong hint to search engines your about preferred version to index among duplicate pages on the web. It’s supported by several search engines, including Yahoo!, Bing, and Google. The rel=canonical link consolidates indexing properties from the duplicates, like their inbound links, as well as specifies which URL you’d like displayed in search results. However, rel=canonical can be a bit tricky because it’s not very obvious when there’s a misconfiguration.


While the webmaster sees the “red velvet” page on the left in their browser, search engines notice on the webmaster’s unintended “blue velvet” rel=canonical on the right.

We recommend the following best practices for using rel=canonical:
  • A large portion of the duplicate page’s content should be present on the canonical version.
  • One test is to imagine you don’t understand the language of the content—if you placed the duplicate side-by-side with the canonical, does a very large percentage of the words of the duplicate page appear on the canonical page? If you need to speak the language to understand that the pages are similar; for example, if they’re only topically similar but not extremely close in exact words, the canonical designation might be disregarded by search engines.
  • Double-check that your rel=canonical target exists (it’s not an error or “soft 404”)
  • Verify the rel=canonical target doesn’t contain a noindex robots meta tag
  • Make sure you’d prefer the rel=canonical URL to be displayed in search results (rather than the duplicate URL)
  • Include the rel=canonical link in either the <head> of the page or the HTTP header
  • Specify no more than one rel=canonical for a page. When more than one is specified, all rel=canonicals will be ignored.
Mistake 1: rel=canonical to the first page of a paginated series

Imagine that you have an article that spans several pages:
  • example.com/article?story=cupcake-news&page=1
  • example.com/article?story=cupcake-news&page=2
  • and so on
Specifying a rel=canonical from page 2 (or any later page) to page 1 is not correct use of rel=canonical, as these are not duplicate pages. Using rel=canonical in this instance would result in the content on pages 2 and beyond not being indexed at all.


Good content (e.g., “cookies are superior nutrition” and “to vegetables”) is lost when specifying rel=canonical from component pages to the first page of a series.

In cases of paginated content, we recommend either a rel=canonical from component pages to a single-page version of the article, or to use rel=”prev” and rel=”next” pagination markup.


rel=canonical from component pages to the view-all page


If rel=canonical to a view-all page isn’t designated, paginated content can use rel=”prev” and rel=”next” markup.

Mistake 2: Absolute URLs mistakenly written as relative URLs


The <link> tag, like many HTML tags, accepts both relative and absolute URLs. Relative URLs include a path “relative” to the current page. For example, “images/cupcake.png” means “from the current directory go to the “images” subdirectory, then to cupcake.png.” Absolute URLs specify the full path—including the scheme like http://.

Specifying <link rel=canonical href=“example.com/cupcake.html” /> (a relative URL since there’s no “http://”) implies that the desired canonical URL is http://example.com/example.com/cupcake.html even though that is almost certainly not what was intended. In these cases, our algorithms may ignore the specified rel=canonical. Ultimately this means that whatever you had hoped to accomplish with this rel=canonical will not come to fruition.

Mistake 3: Unintended or multiple declarations of rel=canonical

Occasionally, we see rel=canonical designations that we believe are unintentional. In very rare circumstances we see simple typos, but more commonly a busy webmaster copies a page template without thinking to change the target of the rel=canonical. Now the site owner’s pages specify a rel=canonical to the template author’s site.


If you use a template, check that you didn’t also copy the rel=canonical specification.

Another issue is when pages include multiple rel=canonical links to different URLs. This happens frequently in conjunction with SEO plugins that often insert a default rel=canonical link, possibly unbeknownst to the webmaster who installed the plugin. In cases of multiple declarations of rel=canonical, Google will likely ignore all the rel=canonical hints. Any benefit that a legitimate rel=canonical might have offered will be lost.

In both these types of cases, double-checking the page’s source code will help correct the issue. Be sure to check the entire <head> section as the rel=canonical links may be spread apart.


Check the behavior of plugins by looking at the page’s source code.

Mistake 4: Category or landing page specifies rel=canonical to a featured article

Let’s say you run a site about desserts. Your dessert site has useful category pages like “pastry” and “gelato.” Each day the category pages feature a unique article. For instance, your pastry landing page might feature “red velvet cupcakes.” Because the “pastry” category page has nearly all the same content as the “red velvet cupcake” page, you add a rel=canonical from the category page to the featured individual article.

If we were to accept this rel=canonical, then your pastry category page would not appear in search results. That’s because the rel=canonical signals that you would prefer search engines display the canonical URL in place of the duplicate. However, if you want users to be able to find both the category page and featured article, it’s best to only have a self-referential rel=canonical on the category page, or none at all.


Remember that the canonical designation also implies the preferred display URL. Avoid adding a rel=canonical from a category or landing page to a featured article.

Mistake 5: rel=canonical in the <body>

The rel=canonical link tag should only appear in the <head> of an HTML document. Additionally, to avoid HTML parsing issues, it’s good to include the rel=canonical as early as possible in the <head>. When we encounter a rel=canonical designation in the <body>, it’s disregarded.

This is an easy mistake to correct. Simply double-check that your rel=canonical links are always in the <head> of your page, and as early as possible if you can.


rel=canonical designations in the <head> are processed, not the <body>.

Conclusion

To create valuable rel=canonical designations:
  • Verify that most of the main text content of a duplicate page also appears in the canonical page.
  • Check that rel=canonical is only specified once (if at all) and in the <head> of the page.
  • Check that rel=canonical points to an existent URL with good content (i.e., not a 404, or worse, a soft 404).
  • Avoid specifying rel=canonical from landing or category pages to featured articles as that will make the featured article the preferred URL in search results.
And, as always, please ask any questions in our Webmaster Help forum.

Easier management of website verifications

Webmaster level: All

To help webmasters manage the verified owners for their websites in Webmaster Tools, we’ve recently introduced three new features:

  • Verification details view: You can now see the methods used to verify an owner for your site. In the Manage owners page for your site, you can now find the new Verification details link. This screenshot shows the verification details of a user who is verified using both an HTML file uploaded to the site and a meta tag:

    Where appropriate, the Verification details will have links to the correct URL on your site where the verification can be found to help you find it faster.

  • Requiring the verification method be removed from the site before unverifying an owner: You now need to remove the verification method from your site before unverifying an owner from Webmaster Tools. Webmaster Tools now checks the method that the owner used to verify ownership of the site, and will show an error message if the verification is still found. For example, this is the error message shown when an unverification was attempted while the DNS CNAME verification method was still found on the DNS records of the domain:

  • Shorter CNAME verification string: We’ve slightly modified the CNAME verification string to make it shorter to support a larger number of DNS providers. Some systems limit the number of characters that can be used in DNS records, which meant that some users were not able to use the CNAME verification method. We’ve now made the CNAME verification method have a fewer number of characters. Existing CNAME verifications will continue to be valid.

We hope this changes make it easier for you to use Webmaster Tools. As always, please post in our Verification forum if you have any questions or feedback.

Making search-friendly mobile websites — now in 11 more languages

Webmaster level: Intermediate

As more and more users worldwide with mobile devices access the Internet, it’s fantastic to see so many websites making their content accessible and useful for those devices. To help webmasters optimize their sites we launched our recommendations for smartphones, feature-phones, tablets, and Googlebot-friendly sites in June 2012.

We’re happy to announce that those recommendations are now also available in Arabic, Brazilian Portuguese, Dutch, French, German, Italian, Japanese, Polish, Russian, Simplified Chinese, and Spanish. US-based webmasters are welcome to read the UK-English version.

We welcome you to go through our recommendations, pick the configuration that you feel will work best with your website, and get ready to jump on the mobile bandwagon!

Thanks to the fantastic webmaster-outreach team in Dublin, Tokyo and Beijing for making this possible!

New first stop for hacked site recovery

Webmaster Level: All

We certainly hope you never have to use our new Help for hacked sites informational series. It's a dozen articles and over an hour of videos dedicated to helping webmasters in the unfortunate event that their site is compromised.


Overview: How and why sites are hacked

If you have further interest in why cybercriminals hack sites for spammy purposes, see Tiffany Oberoi’s explanation in Step 5: Assess the damage (hacked with spam).

Tiffany Oberoi, a Webspam engineer, shares more information about sites hacked with spam

And if you’re curious about malware, Lucas Ballard from our Safe Browsing team, explains more about the topic in Step 5: Assess the damage (hacked with malware).

Lucas Ballard, a Safe Browsing engineer, and I pretend to have a totally natural conversation about malware

While we attempt to outline the necessary steps in recovery, each task remains fairly difficult for site owners unless they have advanced knowledge of system administrator commands and experience with source code. For helping fellow webmasters through the difficult recovery time, we'd like to thank the steady members in Webmaster Forum. Specifically, in the subforum Malware and hacked sites, we'd be remiss not to mention the amazing contributions of Redleg and Denis Sinegubko.

How to avoid ever needing Help for hacked sites
Just as you focus on making a site that's good for users and search-engine friendly, keeping your site secure -- for you and your visitors -- is also paramount. When site owners fail to keep their site secure, hackers may exploit the vulnerability. If a hacker exploits a vulnerability, then you might need Help for hacked sites. So, to potentially avoid this scenario:
  • Be vigilant about keeping software updated
  • Understand the security practices of all applications, plugins, third-party software, etc., before you install them on your server. A security vulnerability in one software application can affect the safety of your entire site
  • Remove unnecessary or unused software
  • Enforce creation of strong passwords
  • Keep all devices used to log in to your servers secure (updated operating system and browser)
  • Make regular, automated backups of your site
Help for hacked sites can be found at www.google.com/webmasters/hacked. We look forward to not seeing you there!

A reminder about selling links that pass PageRank

Webmaster level: all

Google has said for years that selling links that pass PageRank violates our quality guidelines. We continue to reiterate that guidance periodically to help remind site owners and webmasters of that policy.

Please be wary if someone approaches you and wants to pay you for links or "advertorial" pages on your site that pass PageRank. Selling links (or entire advertorial pages with embedded links) that pass PageRank violates our quality guidelines, and Google does take action on such violations. The consequences for a linkselling site start with losing trust in Google's search results, as well as reduction of the site's visible PageRank in the Google Toolbar. The consequences can also include lower rankings for that site in Google's search results.

If you receive a warning for selling links that pass PageRank in Google's Webmaster Tools, you'll see a notification message to look for "possibly artificial or unnatural links on your site pointing to other sites that could be intended to manipulate PageRank." That's an indication that your site has lost trust in Google's index.

To address the issue, make sure that any paid links on your site don't pass PageRank. You can remove any paid links or advertorial pages, or make sure that any paid hyperlinks have the rel="nofollow" attribute. After ensuring that no paid links on your site pass PageRank, you can submit a reconsideration request and if you had a manual webspam action on your site, someone at Google will review the request. After the request has been reviewed, you'll get a notification back about whether the reconsideration request was granted or not.

We do take this issue very seriously, so we recommend you avoid selling (and buying) links that pass PageRank in order to prevent loss of trust, lower PageRank in the Google Toolbar, lower rankings, or in an extreme case, removal from Google's search results.

Make the most of Search Queries in Webmaster Tools

Level: Beginner to Intermediate

If you’re intrigued by the Search Queries feature in Webmaster Tools but aren’t sure how to make it actionable, we have a video that we hope will help!


Maile shares her approach to Search Queries in Webmaster Tools

This video explains the vocabulary of Search Queries, such as:
  • Impressions
  • Average position (only the top-ranking URL for the user’s query is factored in our calculation)
  • Click
  • CTR
The video also reviews an approach to investigating Top queries and Top pages:
  1. Prepare by understanding your website’s goals and your target audience (then using Search Queries “filters” to support your knowledge)
  2. Sort by clicks in Top queries to understand the top queries bringing searchers to your site (for the given time period)
  3. Sort by CTR to notice any missed opportunities
  4. Categorize queries into logical buckets that simplify tracking your progress and staying in touch with users’ needs
  5. Sort Top pages by clicks to find the URLs on your site most visited by searchers (for the given time period)
  6. Sort Top pages by impressions to find valuable pages that can be used to help feature your related, high-quality, but lower-ranking pages
After you’ve watched the video and applied the knowledge of your site with the findings from Search Queries, you’ll likely have several improvement ideas to help searchers find your site. If you’re up for it, let us know in the comments what Search Queries information you find useful (and why!), and of course, as always, feel free to share any tips or feedback.