Add +1 to help your site stand out

(Cross-posted on the Webmaster Central and Social Web blogs)

When we introduced the +1 button in March, Google search took a small step in an important direction. Search results can be more helpful, and more personal, when recommendations from the people you trust are there to guide your way.

The +1 button can help publishers, too. As potential visitors see recommendations from their friends and contacts beneath your Google search results, you could see more, and better qualified, traffic coming from Google.

Since we announced +1, we’ve gotten lots of requests from Google search users and webmasters alike for +1 buttons in more places than just search results. That’s why today we’re making the +1 button available to sites across the web. Sometimes you want to recommend a web page after you’ve visited it. After all, how do you know you want to suggest that great article on Spanish tapas if you haven’t read it yet?

We’ve partnered with a few sites where you’ll see +1 buttons over the coming days:
Partner LogosAddThisMashableHuffington PostRotten TomatoesNordstromO'ReillyReutersWashington PostBest BuyTechCrunchBloomberg

You'll also start to see +1 buttons on other Google properties such as Android Market, Blogger, Product Search and YouTube.

Adding +1 buttons to your pages is a great way to help your content stand out in Google search. By giving your visitors more chances to +1 your pages, your search results and search ads could show up with +1 annotations more often, helping users see when your pages are most likely to be useful.
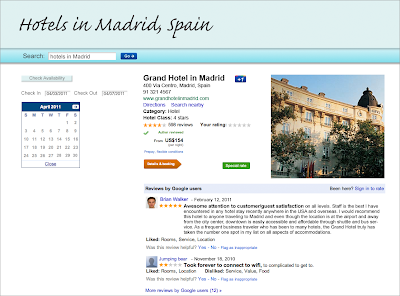

To get started, visit the +1 button tool on Google Webmaster Central. You’ll be able to configure a small snippet of JavaScript and add it to the pages where you want +1 buttons to appear. You can pick from a few different button sizes and styles, so choose the +1 button that best matches your site’s layout.
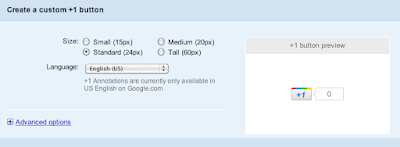
In the common case, a press of the button +1’s the URL of the page it’s on. We recommend some easy ways to ensure this maps as often as possible to the pages appearing in Google search results.

If your site primarily caters to users outside of the US and Canada, you can install the +1 button code now; the +1 button is already supported in 44 languages. However, keep in mind that +1 annotations currently only appear for English search results on Google.com. We’re working on releasing +1 to searchers worldwide in the future.

If you have users who love your content (and we bet you do), encourage them to spread the word! Add the +1 button to help your site stand out with a personal recommendation right at the moment of decision, on Google search.

To stay current on updates to the +1 button large and small, please subscribe to the Google Publisher Buttons Announce Group. For advanced tips and tricks, check our Google Code site. Finally, if you have any questions about using the +1 button on your websites, feel free to drop by the Webmaster Help Forum.

Summarize your data with pivot tables

Starting today, we're rolling out pivot tables in Google spreadsheets. Pivot tables make it easy to process and summarize large data sets in seconds. Check out the video below for a look at how pivot tables work in Google spreadsheets:


In essence, a pivot table does just that -- it allows you to “pivot” or rotate data, thus looking at it from different angles and seeing a variety of patterns which may not be immediately obvious. Let’s take a very simple example of a list of students. This list includes a number of students and some information about them, including gender, class level, and major.


To create a pivot table, select your data and go to Data > Pivot Table Report. In the pivot table report editor, you can add fields to set your rows, columns, and values and can drag and drop the fields around within the editor. Here, we’ve used pivot tables to display the number of students in each class level by gender.


Fields in the Values section can be summarized using built-in formulas to sum, count, or otherwise calculate your data. In the example above the number of students in each class level was summarized via a simple count.


The filter section lets you specify exactly what data you want to be included in the pivot table. For example, we can choose to only count the students in certain extracurricular activities.


With each change, the pivot table is updated in real-time for both you and any collaborators. If you prefer to make changes in batches, you can switch to manual mode. In this mode, your changes won’t be saved until you select Update table.

You can try pivot tables out for yourself using this template or by using your own data set. Please note that pivot tables from Microsoft Excel can’t be uploaded to Google spreadsheets at this time.

We hope you’ll enjoy exploring pivot tables in Google spreadsheets and that they’ll save you time analyzing your data. Check out our help content for even more examples.

Upload images in Google Spreadsheets

(Cross-posted to the Google Enterprise Blog)

We’re excited to announce that you can now upload images to Google spreadsheets. From the Insert menu, select Image... Then, choose an image file to upload into your spreadsheet.


With this feature, you can upload an image already stored on your computer, search for an image online, or add personal photos directly from one of your Picasa Web Albums.


Let us know what you think in the Google spreadsheets forum!

Introducing the new Google Docs app for Android

Increasingly, people are using mobile phones to access information -- from email to web browsing to editing documents. Part of getting work done on the go is being able to easily access, edit and share content, which is why we’re happy to announce the new Google Docs app for Android.

With this new app it’s easy to filter and search for your content across any Google account, then jump straight into editing docs using the online mobile editors. The app also allows you to easily share items with contacts on your phone, right from within the app.


The Docs app also allows you to upload content from your phone and open documents directly from Gmail. You can also add a widget to your home screen for easy access to three core tasks: jumping to your starred documents, taking a photo to upload, or creating a new document with one tap.


And my favorite feature: Using the app and your phone’s camera, you can turn photos with text into editable Google documents with the power of optical character recognition (OCR). Just create a new ‘Document from Photo' or select the camera icon from the widget, and your converted document will appear in your documents list shortly after you snap the picture. You can also convert photos already stored on your phone by sharing them with the Google Docs app. OCR does a pretty good job capturing unformatted text in English but won't recognize handwriting or some fonts - stay tuned, it will get better over time!


The Google Docs app is currently available in English and works on Android 2.1+ phones. Try it out by scanning the QR code below or by visiting Android Market.


Let us know what you think of the new Google Docs Android app in our forum.

Simpler file upload in Google Docs

Last November, we added the ability to drag and drop files from your desktop to the upload page, improving the ability to upload any file. Over the next few weeks, we’re releasing three additional features to make it easy to upload files to Docs: folder upload, documents list integration, and drag-and-drop upload.

To start, we’ve added folder upload via the new Upload menu in the latest versions of Chrome, Firefox and Safari.


You’ll need to install a small applet to use folder upload in Firefox and Safari. The existing folder structure is preserved on upload which means that folders within folders will also upload and become collections within collections.

Second, we’ve merged the upload page’s functionality into the documents list to create a much better upload experience. When you upload files via the new drop-down menu, a window will pop up in the bottom right of your documents list and show upload progress.


Once files are uploaded, they will appear in your documents list within seconds. You can also share them from the pop-up. Uploaded files go into the currently selected collection and have visibility set to private unless the collection is shared.

Upload settings have also moved. The first time you use the new upload method, you’ll see a pop-up asking you whether you want to convert files to the Google Docs format and if you want to convert images via Optical Character Recognition (OCR). You can always return to these settings via the drop down in the upload menu or the pop-up.


Lastly, if you are using Chrome, Safari and Firefox on your Mac or PC, you’ll also be able to drag-and-drop one or more files directly into your documents list to initiate an upload. You can even drop files directly into a collection on the left. Note due to browser limitations it isn’t possible to drag-and-drop folders directly into the documents list.


If you hit your storage limit, the upload will return an error and you’ll need to delete files or purchase additional storage for Google Docs for $0.02 per GB per month ($0.25 per GB per year). Please note that the new upload capabilities don’t support the ability to select a language when converting a document via OCR (Optical Character Recognition) or select visibility settings before upload. If you’d like to use these features, you can still use the older version of the upload page by choosing Basic... from the Upload menu.

We’ll be rolling this out to everyone with personal Google Accounts over the next month in all Google Docs languages. Rapid Release Google Apps users can expect to see the feature rolled out shortly thereafter. You’ll know when the features are available to you when you see a popup message at the top of your documents list.

If you have any additional questions about the upcoming changes to uploading files, check out our FAQ.


Update: This is now rolled out to everyone.

Pagination comes to Google Docs

(Cross-posted on the Official Google Blog and Google Enterprise Blog)

Exactly one year ago, we launched a new version of the Google document editor, created from the ground up to take advantage of the latest capabilities in modern web browsers like Chrome. In particular, we baked in a way of supporting text features that aren’t natively included with browsers—for example, we added a ruler for controlling the margins, text that wraps around images to create eye-catching docs and discussions for a more collaborative editing experience.

Today, we’re doing another first for web browsers by adding a classic word processing feature—pagination, the ability to see visual pages on your screen. We’re also using pagination and some of Chrome’s capabilities to improve how printing works in Google Docs. Pagination is rolling out now and should be available to everyone by the end of the day.


Pagination adds visual page breaks while you’re editing your documents, so now you can see how many pages of that report you’ve actually finished. Because we’re able to show you individual pages, we can improve the way other features work too: headers now show up at the top of each page instead of just at the top of your doc, manual page breaks actually move text onto a new page and footnotes appear at the bottom of the pages themselves.


If you prefer editing documents with a continuous layout, you can hide page breaks by selecting the “Compact” document view from the “View” menu.


Pagination also changes what’s possible with printing in modern browsers. We’ve worked closely with the Chrome team to implement a recent web standard so we can support a feature called native printing. Before, if you wanted to print your document we’d need to first convert it into a PDF, which you would then need to open and print yourself. With native printing, you can print directly from your browser and the printed document will always exactly match what you see on your screen.

For now, native printing is only available in Google Chrome, but we’re hoping other browsers will implement the same web standard so everyone can have the best possible printing experience with Docs.

Pagination and native printing are great examples of how modern browsers are making it possible to take the best parts of the desktop experience and bring them online. Please share your feedback on the Google Docs forum.

Improved printing in Spreadsheets

In January, we added support for Google Cloud Print to mobile documents. Today, we’re extending that functionality to mobile spreadsheets and adding some additional printing improvements to the desktop version of Google spreadsheets.

Mobile printing for spreadsheets
Now you can print your spreadsheets to any cloud-connected printer right from your phone by selecting Print... underneath the spreadsheet title. This feature will work on most phones and tablets that support HTML5, such as devices running Android 2.1+ and iOS 3+.


Improved desktop printing
We’ve added a number of printing options, including spreadsheet titles, sheet names and page numbers. You have control over which of these you want to print.


We hope you enjoy these improvements to printing.

Donate your ad cents (and dollars) to help Japan

A few weeks ago, we posted about how you can help Japan by donating via our crisis response page. We’ve been working to enable you to directly donate your AdSense earnings, and are happy to announce that you can donate a portion or all of your entire unpaid balance as of March 31, 2011 to the Japanese Red Cross via the Tides Foundation by filling out this donation form. If you have at least $10 in your account, we invite you to donate your earnings between April 1 and April 12.

Please keep in mind that all our normal policies still apply -- so please don't ask others to click on your ads in order to increase your earnings.

Due to technical limitations, we can only provide the opportunity for you to donate your earnings directly from your AdSense account if your reporting currency is in U.S. Dollars. If your reporting currency isn't in USD, and you'd still like to donate your AdSense earnings, please use the crisis response page instead.

We know that you may be interested in donating your earnings to additional charities and causes, and we're working to enable this functionality soon for all publishers. Stay tuned to the Inside AdSense blog for future opportunities to donate in other ways!


This blog has been updated to remove information that is no longer current.

38 more languages and minimize toolbar added to Google Cloud Connect for Microsoft Office

Just over a month ago, we launched Google Cloud Connect for Microsoft Office, adding simultaneous collaboration, revision history, cloud sync, unique URLs and simple sharing to the Microsoft Word, Excel and PowerPoint applications.

Today, we’re happy to release our first update that adds support for 38 more languages and adds the ability to minimize the toolbar. Here is what Google Cloud Connect looks like in Japanese:


Due to popular request, we’ve added the option to minimize Google Cloud Connect by clicking on a new minimize arrow. When the document is synced, the minimized bar will still show upload progress.


This update is available to everyone today. If you’re already downloaded Google Cloud Connect, you’ll receive an update automatically. If you’re new to Google Cloud Connect, you can download the plugin -- in any of the 39 supported languages -- on the download page.

+1 to great web content

Most successful AdSense publishers have something in common: users who are passionate about their content. Today we’re making it easy for the users who love your content to recommend it to their friends and contacts with the +1 button.

We think sharing on the web can be even better -- that people might share more recommendations, more often, if they knew their advice would be used to help their friends and contacts right when they’re searching for relevant topics on Google. The +1 button is an easy way for users to recommend your content right from the search results pages. The +1 button doesn’t affect the AdSense ad units on your site, but it can improve the way your pages appear in Google search.


+1 is a simple idea. Let’s use Brian as an example. When Brian signs in to his Google Account and sees your site in the organic search results on Google (or search ads if you’re using AdWords), he can +1 it and recommend your page to the world.

The next time Brian’s friend Mary is signed in and searching on Google and your page appears, she might see a personalized annotation letting her know that Brian +1’d it. So Brian’s +1 helps Mary decide that your site is worth checking out.

We expect that personalized annotations will help sites stand out by helping users see when your Google search results are personally relevant to them. As a result, +1’s could increase both your quality and quantity of Google search traffic.

But the +1 button isn’t just for search results. We’re working on a +1 button that you can put on your pages too, making it easy for people to recommend your content on Google search without leaving your site. If you want to be notified when the +1 button is available for your site, you can sign up for email updates at our +1 webmaster site.

Over the coming weeks, we’ll add +1 buttons to search results and ads on Google.com. We’ll also start to look at +1’s as one of the many signals we use to determine a page’s relevance and ranking. For +1's, as with any new ranking signal, we'll be starting carefully and learning how those signals affect search quality over time. At first the +1 button will appear for English searches only on Google.com, but we’re working to add more languages in the future.

We’re excited about using +1’s to make search more personal, relevant and compelling. We hope you’re excited too! If you have questions about the +1 button and how it affects search on Google.com, you can check the Google Webmaster Central Help Center.